LangGraph 기초 샘플 만들기 Creating a Basic LangGraph Sample
간단한 '연구 & 글쓰기' 에이전트를 만들고, Langfuse를 이용해 로컬에서 실시간으로 시각화하는 방법을 안내합니다. 이 가이드를 통해 LangGraph의 기본 개념인 상태(State), 노드(Node), 엣지(Edge)를 이해하고 실제 코드로 구현해볼 수 있습니다. This guide shows how to create a simple 'Research & Write' agent and visualize it in real-time locally using **Langfuse**. Through this guide, you will understand the basic concepts of LangGraph—State, Node, and Edge—and implement them in actual code.
1. 시작하기 전에: 환경 설정 1. Before You Start: Environment Setup
필요한 라이브러리들을 설치합니다. 실행 과정 추적을 위해 `langfuse`와 환경 변수 관리를 위한 `python-dotenv`를 추가합니다. Install the necessary libraries. We'll add `langfuse` for tracking execution and `python-dotenv` for managing environment variables.
pip install langgraph langchain langchain_google_genai langfuse python-dotenv프로젝트 폴더에 `.env` 파일을 만들고 Google API 키와 나중에 발급받을 Langfuse 키를 저장할 준비를 합니다. Create a `.env` file in your project folder to store your Google API key and the Langfuse keys you will obtain later.
# .env 파일 내용.env file content
GOOGLE_API_KEY='your-google-api-key-here'

# Langfuse 설정 (4단계에서 채울 예정)Langfuse settings (to be filled in step 4)
LANGFUSE_SECRET_KEY=""
LANGFUSE_PUBLIC_KEY=""
LANGFUSE_HOST="http://localhost:3000"
다음과 같은 디렉토리 구조로 프로젝트를 구성합니다. Structure your project with the following directory layout.
my-langgraph-agent/
├── .env
└── run_agent.py
2. 에이전트 설계: 상태, 노드, 엣지 2. Agent Design: State, Nodes, and Edges
우리가 만들 에이전트는 '주제'를 받아 '리서치'를 수행하고, 그 결과를 바탕으로 '글을 쓰는' 간단한 워크플로우를 가집니다. The agent we will build has a simple workflow: it takes a 'topic', performs 'research', and then 'writes' based on the results.
- 상태 (State):State: 작업 흐름 전체에서 '주제(topic)'와 '리서치 결과(research_result)'를 공유합니다. Shares the 'topic' and 'research_result' throughout the entire workflow.
- 노드 (Node):Nodes: '리서처(researcher)'와 '작가(writer)'라는 두 개의 작업 단위를 정의합니다. Defines two work units: a 'researcher' and a 'writer'.
- 엣지 (Edge):Edges: '리서처'가 끝나면 '작가'로 작업이 넘어가도록 흐름을 연결합니다. Connects the flow so that the task moves from the 'researcher' to the 'writer' upon completion.
3. 전체 코드 작성 3. Writing the Full Code
아래 코드를 `run_agent.py` 파일로 저장하세요. Langfuse와 연동하기 위한 코드가 포함되어 있습니다. Save the code below as `run_agent.py`. It includes the code for integration with Langfuse.
import os
from typing import TypedDict
from dotenv import load_dotenv
from langchain_google_genai import ChatGoogleGenerativeAI
from langgraph.graph import StateGraph, END
from langfuse.callback import CallbackHandler

# --- 0. 환경 변수 로드 (.env에 KEY들을 저장) ------ 0. Load environment variables (store KEYS in .env) ---
load_dotenv()

# --- 1. Langfuse 콜백 핸들러 초기화 ------ 1. Initialize Langfuse Callback Handler ---
# .env 파일에 저장된 키를 사용하여 핸들러를 생성합니다.Create the handler using keys stored in the .env file.
langfuse_handler = CallbackHandler(
    public_key=os.getenv("LANGFUSE_PUBLIC_KEY"),
    secret_key=os.getenv("LANGFUSE_SECRET_KEY"),
    host=os.getenv("LANGFUSE_HOST")
)

# --- 2. 그래프용 상태 정의 ------ 2. Define State for the Graph ---
class AgentState(TypedDict):
    topic: str
    research_result: str

# --- 3. 노드 함수 정의 ------ 3. Define Node Functions ---
def researcher(state: AgentState):
    print("--- 리서처 노드 실행 ------ Executing Researcher Node ---")
    topic = state["topic"]
    llm = ChatGoogleGenerativeAI(model="gemini-1.5-flash", temperature=0)
    research_result = llm.invoke(
        f"'{topic}'에 대한 핵심적인 사실 3가지를 알려줘.Tell me 3 key facts about '{topic}'."
    ).content
    print(f"리서치 결과: Research Result: {research_result}")
    return {"research_result": research_result}

def writer(state: AgentState):
    print("--- 작가 노드 실행 ------ Executing Writer Node ---")
    research_result = state['research_result']
    llm = ChatGoogleGenerativeAI(model="gemini-1.5-flash", temperature=0.7)
    final_output = llm.invoke(
        f"다음 정보를 바탕으로 흥미로운 단락을 작성해줘:\n\nWrite an interesting paragraph based on the following information:\n\n{research_result}"
    ).content
    print(f"최종 결과물:\nFinal Output:\n{final_output}")
    return {}

# --- 4. 그래프 구축 ------ 4. Build the Graph ---
workflow = StateGraph(AgentState)
workflow.add_node("researcher", researcher)
workflow.add_node("writer", writer)
workflow.set_entry_point("researcher")
workflow.add_edge("researcher", "writer")
workflow.add_edge("writer", END)
app = workflow.compile()

# --- 5. 실행 ------ 5. Execute ---
inputs = {"topic": "인공지능의 역사The History of Artificial Intelligence"}
print("Langfuse와 함께 그래프 실행을 시작합니다…Starting graph execution with Langfuse…")
app.invoke(inputs, config={"callbacks": [langfuse_handler]})

# --- 6. 남은 이벤트 전송 ------ 6. Flush remaining events ---
langfuse_handler.flush()
print("완료! 대시보드에서 확인하세요 →Done! Check it out on the dashboard →", os.getenv("LANGFUSE_HOST"))
4. 로컬에서 실시간 시각화하기 (Langfuse) 4. Real-time Local Visualization (Langfuse)
단계 1: Langfuse Docker 컨테이너 실행 Step 1: Run the Langfuse Docker Container
Langfuse를 로컬에서 사용하려면 Docker가 필요합니다. 터미널을 열고 아래 명령어를 실행하여 공식 `docker-compose.yml` 파일을 다운로드하세요. To use Langfuse locally, you need Docker. Open a terminal and run the command below to download the official `docker-compose.yml` file.
curl -o docker-compose.yml https://raw.githubusercontent.com/langfuse/langfuse/main/docker-compose.yml다운로드가 완료되면, 아래 명령어로 Langfuse 서버를 백그라운드에서 실행시킵니다. Once the download is complete, run the following command to start the Langfuse server in the background.
docker compose up -d단계 2: Langfuse UI 접속 및 API 키 발급 Step 2: Access Langfuse UI and Get API Keys
웹 브라우저에서 http://localhost:3000 주소로 접속하세요. 처음 접속 시 계정을 생성하고 로그인한 뒤, 새로운 프로젝트를 만듭니다. 그 다음, 프로젝트의 Settings > API Keys 메뉴로 이동하여 `Secret Key`와 `Public Key`를 복사합니다. Open your web browser and go to http://localhost:3000. On your first visit, create an account, log in, and then create a new project. Next, navigate to the project's Settings > API Keys menu to copy the `Secret Key` and `Public Key`.
단계 3: .env 파일에 API 키 설정 Step 3: Set API Keys in the .env File
1단계에서 만들었던 `.env` 파일을 열고, 방금 복사한 키들을 붙여넣습니다. Open the `.env` file you created in Step 1 and paste the keys you just copied.
# .env 파일.env file
GOOGLE_API_KEY='your-google-api-key-here'

LANGFUSE_SECRET_KEY="sk-lf-..." # 복사한 Secret KeyCopied Secret Key
LANGFUSE_PUBLIC_KEY="pk-lf-..." # 복사한 Public KeyCopied Public Key
LANGFUSE_HOST="http://localhost:3000"
단계 4: Python 스크립트 실행 및 결과 확인 Step 4: Run the Python Script and Check the Results
이제 모든 설정이 완료되었습니다. 터미널에서 `run_agent.py` 파일을 실행합니다. All settings are now complete. Run the `run_agent.py` file from your terminal.
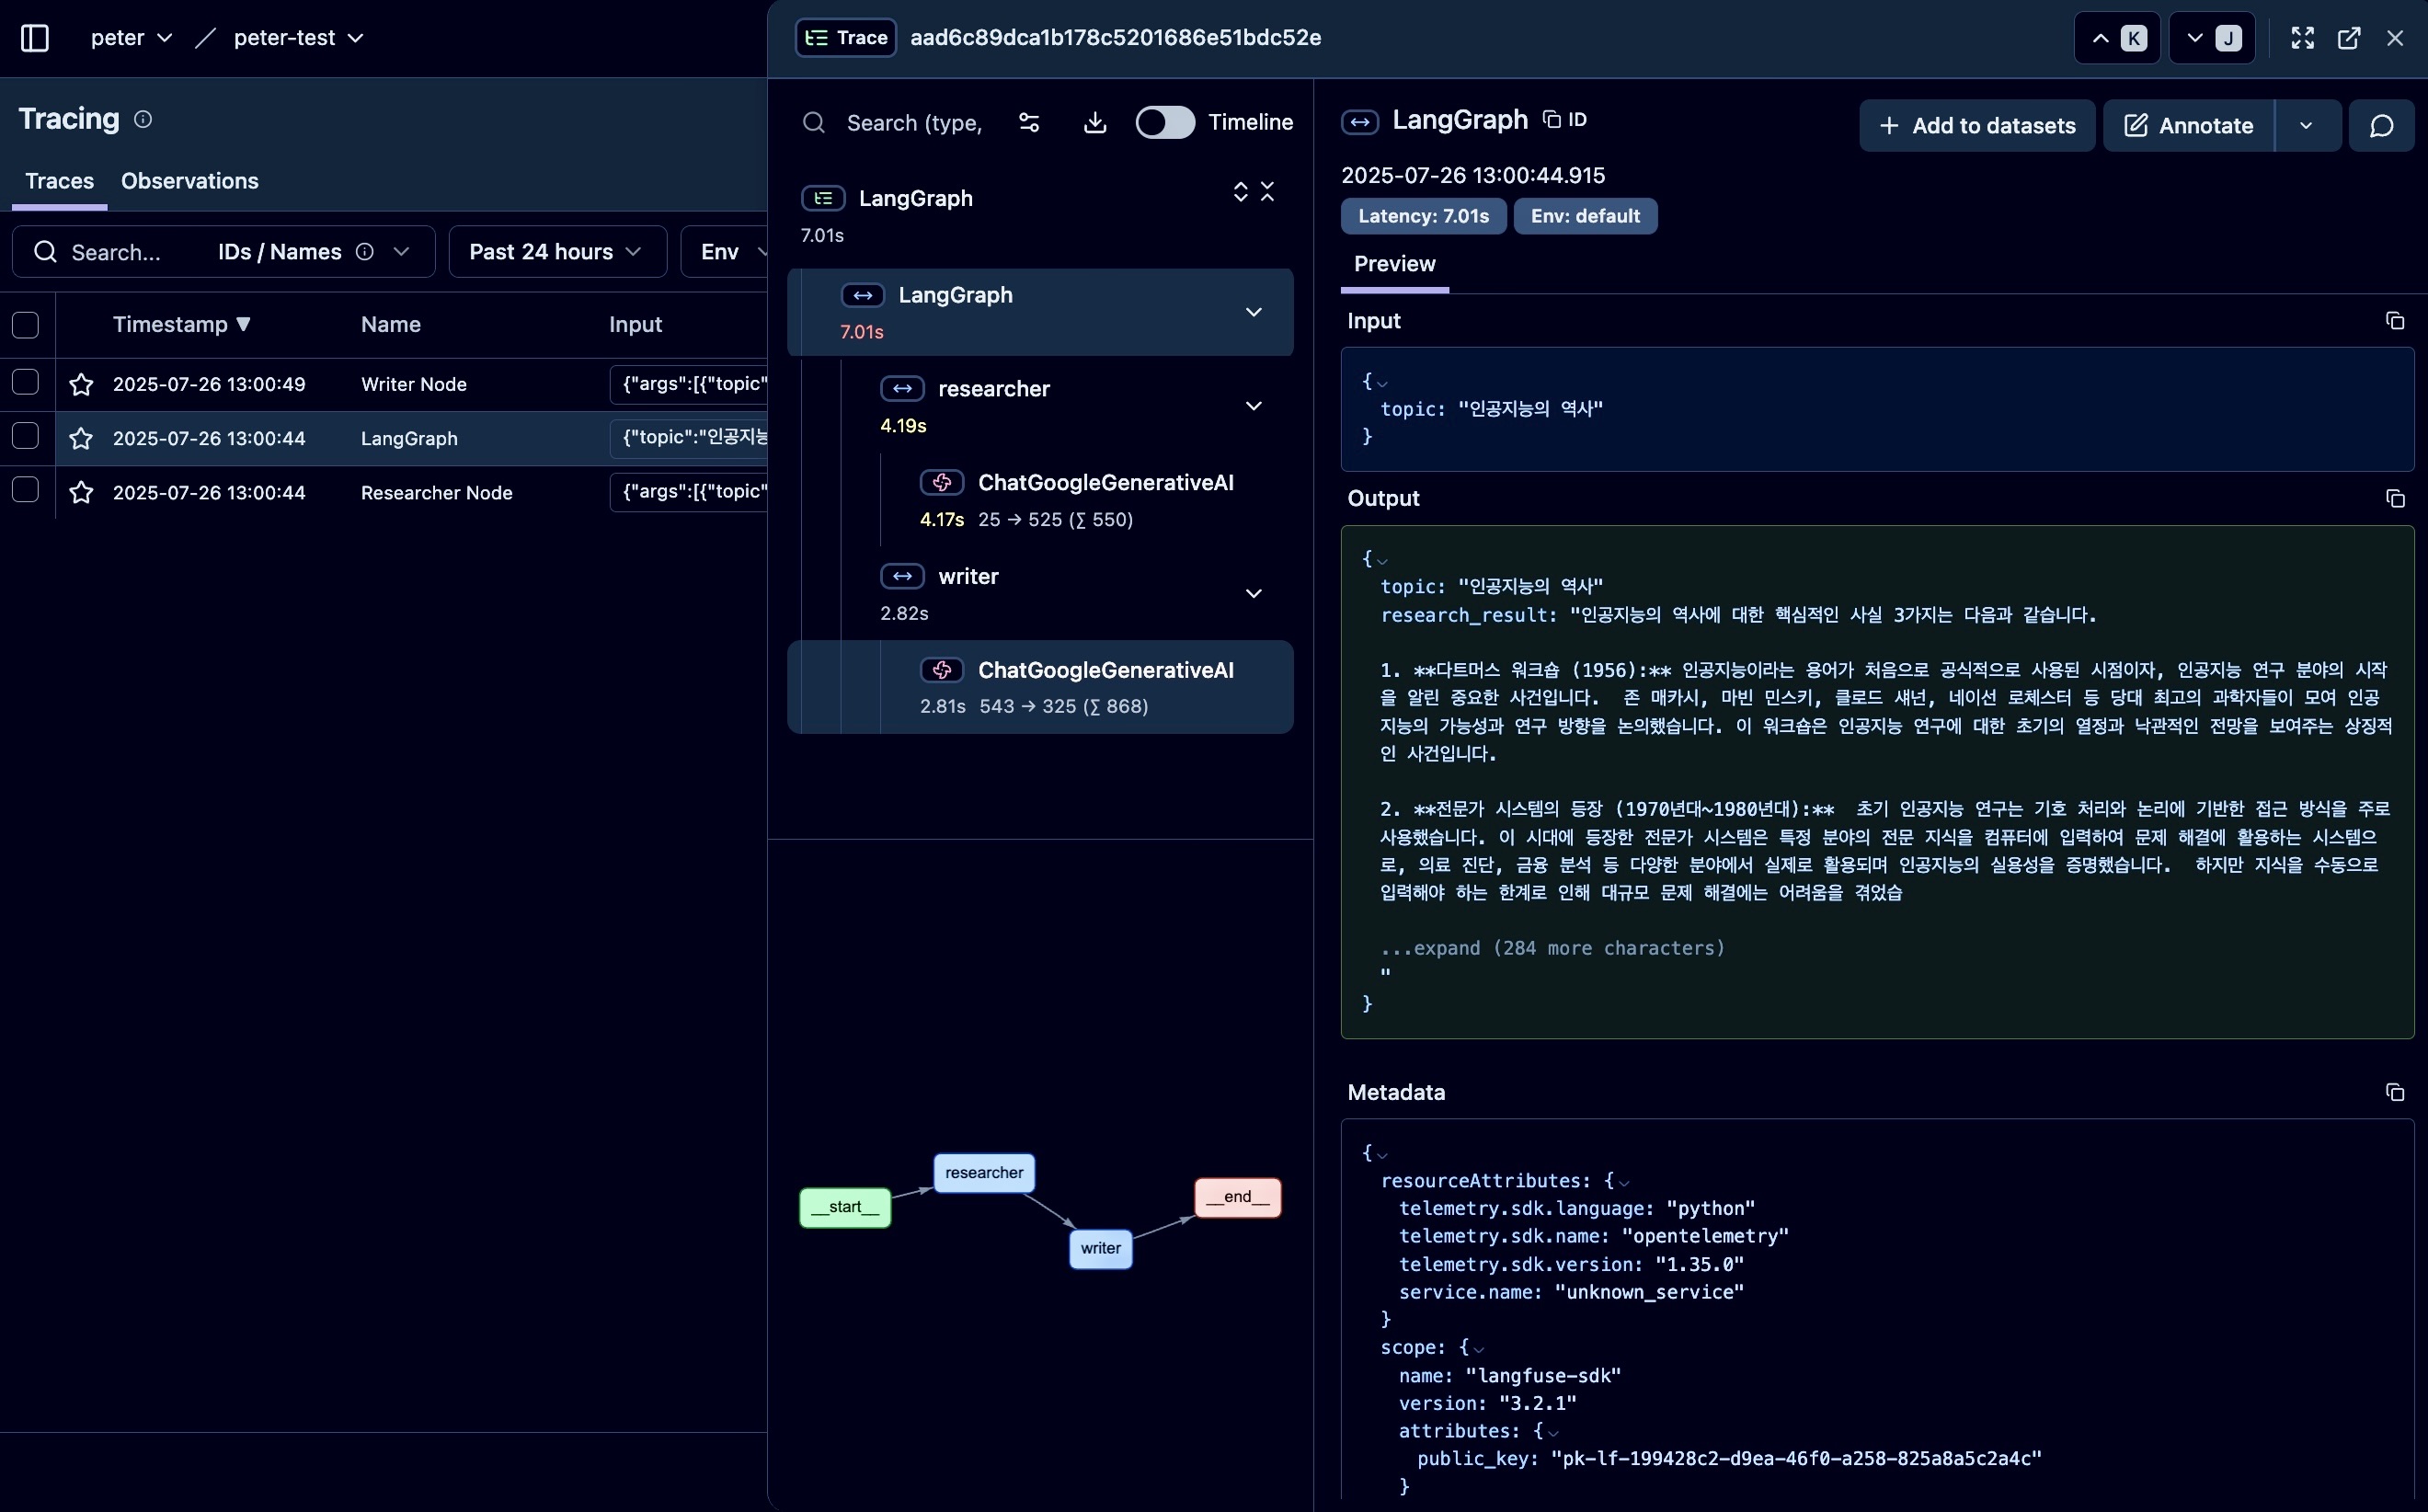
python run_agent.py스크립트 실행이 완료된 후, 다시 http://localhost:3000의 Langfuse 대시보드를 확인하세요. 아래와 같이 에이전트의 실행 과정(Trace)이 생성된 것을 시각적으로 추적할 수 있습니다. After the script finishes, check the Langfuse dashboard at http://localhost:3000 again. You will be able to visually track the agent's execution process (Trace) as shown below.